

The Ultimate Open Home Inspection Guide
It’s time. Your mortgage is pre-approved, your deposit is ready, and you are about to unleash yourself on the open inspection market. Excited, inspired, and ready to purchase, you are about to embark on what could potentially be a marathon of open home inspections. While you should be prepared to engage a professional building inspector on houses that you think fit your criteria, you can narrow down the field of contenders and save money by eliminating the obviously risky or damaged properties from further consideration.
This article will help you recognise the danger signs of expensive repairs, neglected maintenance or money pits so that you can strike some properties off your list early. This comprehensive directory will cover these essential areas:
How to prepare for an open home inspection
Red flags to look for:
- General house inspection red flags
- Floor and underfloor – what to look for
- Walls – what to look for
- Water damage and wet areas – what to look for
- House exterior – what to look for
- Pest and insect red flags
What to ask the agent
What comes after the open home?
While it is recommended that you never purchase a property without a professional building inspection, knowing what obvious signs to look for yourself can save you from falling in love with a property with glaringly obvious and expensive repair work required before you even start the interior design and decorating. Save yourself stress, money and emotional disappointment by following our ultimate guide to open house inspections. And if you are new to the property market, check out our First Home Buyers Guide for more tips on avoiding big mistakes.
Before you attend an open home
Before you hit the pavement this weekend, make a thorough short list of properties you hope to inspect, and check out their open home schedule. You usually only have an hour or so to get in, see the property, assess its viability and either make an offer or hit the next one. Making an offer on the spot is high risk. This is something that’s only begun since Brisbane’s property market went nuts. So, you need to walk in there fully prepared.
- Choose your priority open homes to attend – thoroughly assess a shortlist via your preferred property portal. Assess not just cost but value and potential.
- Use our website to check for any known problems with the suburb. See a comprehensive guide to Brisbane Suburbs here.
- Research the property history including previous sales, flood maps and even visit the Queensland Police Crime Map – just to make sure you’re not moving in next door to a meth lab!
- Check recent sales of similar properties in the area – is this property good value? Is it too good? That’s a red flag!
- Check out amenities you need nearby – from good schools to good pubs!
- Look for any pending development applications in the area, or changes to the area’s zoning. No point in buying in a lush, forested area if it’s about to be developed.
- Research any ‘architectural’ features and the style of home (Queenslander, worker’s cottage, etc) that may pose additional risks. This will give you a more comprehensive list of red flags to look for at the open home.
- Get a quote for insurance on the property. If your insurance quote is very high, ask why. The property may have a history of flooding, despite not being directly in a flood zone. It may have a history of break-ins or other problems. An insurance company knows more about the property than you will.
- Where possible, do drive-bys on the property before the open home. Is the area quiet at night? Are there major parking issues by day? Is it filled with families or young people?
- Be prepared to find a winner! Know which building inspector, pest inspector and conveyancer you plan to use. Once the offer is made, the clock starts ticking and ticking fast!
- Be prepared to find losers. Keep a clear list of criteria for your purchase – this will stop you “falling in love with a lemon.”
- Create a checklist for each property, so you don’t forget what you’re looking for at the open home.
What to Bring with you to an open home inspection
Whilst attending open home inspections can be exciting, it can also feel overwhelming, particularly if you are viewing multiple properties in one day. To make the most of your visits, we recommend taking a few essential items with you.
- Notepad and pen – The hunt for your new home will involve you inspecting many homes before you find ‘the one.’ Noting down first impressions, pros and cons, and any questions you’d like to ask the agent for each property as you go is a great way to keep track and help you recall specifics later.
- Tape measure – This is a must-have item for a home inspection. Are the hallways and doors large enough to get your furniture in? How high are the ceilings? Are the bedrooms large enough to accommodate your beds? Is the garage large enough for your vehicle or storage? Will appliances like your washing machine, dishwasher or fridge/freezer fit in the available recesses? You get the idea!
- Small flashlight – It’s a good idea to shine a light on those dark, hard-to-see places such as cupboards, under sinks and garages to check for potential issues or red flags.
- Phone or camera – Take photos to document key features or issues so you can refer to them later.
- Friend or partner – Four eyes are better than two! Having someone to give you a second opinion can be helpful, as they may notice things that you miss.
- ID – It might sound like an obvious one, but you’d be surprised how many disappointed people are turned away from a home inspection because they forgot to take their ID!
What to look for at an Open Home
Just like you shouldn’t judge a book by its cover, the same goes for a property. Unfortunately, when it comes to selling a property, owners can often be less than honest and resort to cover-ups, crossing their fingers and toes in the hope that their hidden secrets aren’t found.
Now that your buying journey has started, these are the red flags to look out for at your next house inspection.
Painted walls
A coat of fresh paint always does wonders to uplift a property for sale, but always question areas that look to be spot-painted. In particular, look for one room painted a different colour to the rest of the house, or rooms where only one wall or section of the ceiling is painted. This could potentially be the seller trying to cover up an underlying problem.
DIY work and repairs
With the rise of DIY (thanks to popular home renovation shows), there are many properties with DIY repairs and renovations. Some are done very well, but there’s also a lot of dodgy DIY out there. Bad DIY jobs to look for include dodgy plumbing, electrical and carpentry work, leaky taps, and uneven flooring.
Heating and cooling systems
An important consideration when buying a new home is how comfortable it’s going to be to live in year-round. The last thing you want to discover too late is that it’s a hot box during summer and an ice box during the winter.
For this reason, we always recommend that you turn on the heating and cooling system during an inspection to see whether it heats up or cools down efficiently. Also, pay attention to any noises or smells whilst it is turned on. Be aware that older systems are usually much less efficient than newer models and can skyrocket your energy bills.
Strange smells and water damage warning signs
Real estate agents love to encourage sellers to create a certain feel when potential buyers enter a property, suggesting everything from baking something in the oven to burning oils or having fresh flowers throughout the house. This is a lovely touch, but are these pleasant aromas hiding something they don’t want you to know about?
Pay very close attention to odours. The property could have an unpleasant pet odour or a strong smell of dampness, which is a sign of more serious problems. If you’re concerned that the ‘nice’ smells are getting in the way of a thorough house inspection, request a second visit without the candles, food, and flowers.
If you go for your second inspection, have a thorough look, smell and feel with this checklist:
- Check the outside and the foundations. Look for large cracks, moisture retention, and salt dampness.
- Check the eaves outside for signs of water damage or large leafy trees near the roof. Check that gutters are maintained regularly. Are they currently blocked?
- Inside, run your eyes over the walls looking for cracks in the wall linings, and water damage or mould on the ceiling linings. Also, look for door openings that run out of alignment or doors that don’t close correctly.
- Open cupboards under taps, check for water damage or mould and smell for musty odours that signal hidden mould. Look at the gyprock around the interior and exterior of wet areas to see apparent indications of internal wall leaks and water damage.
- Check the floor for waves or dips and look for gaps between the flooring and the skirting boards. Any sign of a sinking floor can be a big red flag.
The neighbourhood
You’ve finally found a house for sale in one of your favourite neighbourhoods, but don’t let that cloud your judgement. The best way to ascertain if the property is for you is to arrange a house inspection at different times throughout the week.
Drive around the area both during the day and at night. Are there yards full of car bodies, or fences covered in graffiti? Check playgrounds for signs of being well-maintained and cared for by the neighbourhood and council. Make sure to do the scenic drive at night and look for maintained streetlights and any unusual activity or houses.
What is the traffic like in the area, and where is the public transport? For example, is there a train line running along the back fence?
If you have a particular suburb in mind, it is a great idea to check the schools in the area and look for other children in the neighbourhood – keep an eye out for bikes, basketball hoops and scooters in front yards. This is a good indication of a trusting neighbourhood.
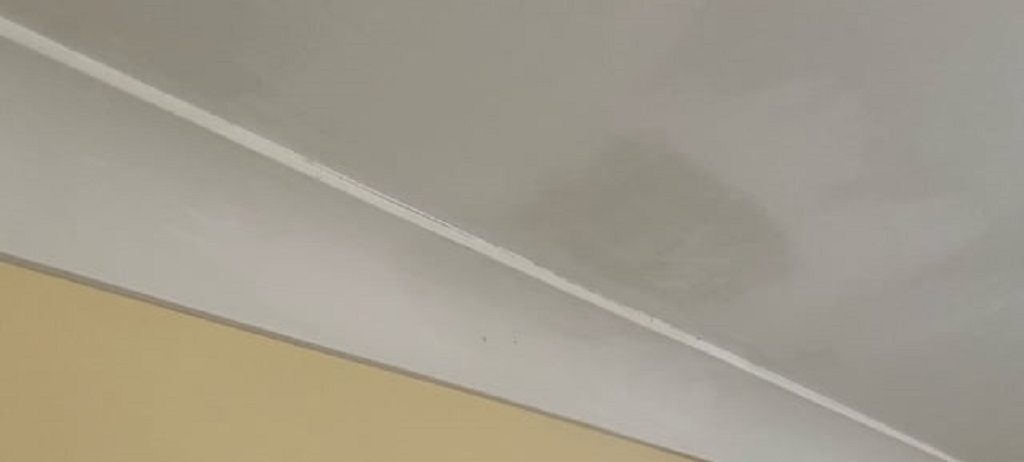
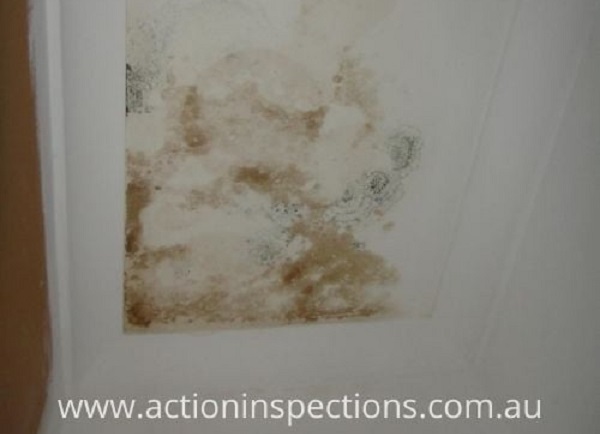
Stains on walls
Stains on walls may not just be the result of an owner with a lax cleaning schedule. It could hold the answer to some underlying issues. It’s essential to find out the cause of these stains through a pre-purchase property inspection.
Stains on walls could be the result of so many things, including a roof leak, internal plumbing leak, a shower leak, or mould from poor ventilation. Stains may look like an easy fix, but their underlying problems can cost thousands of dollars to resolve.
Electricals
Although electricals should be inspected by a licensed electrician, there are still obvious things to look out for, particularly in older properties.
In addition to dodgy DIY repairs, keep an eye out for:
- exposed wiring
- the condition of the power points and switches – test switches to see if the lights flicker
- adequate smoke alarms
Unfortunately, DIY electrical work not only costs money to rectify but can pose a serious safety risk. Some older properties may have wiring with conduit insulation that is old and hazardous.
We always recommend having a licensed electrician complete a thorough inspection to ensure electricals abide by current government regulations.
Drainage
Living in Brisbane, we have plenty of dry periods, so it’s difficult to see whether a property has drainage issues. Normally, this would be evident by pooling water and overflowing gutters. However, there are some obvious red flags you can see without the rain.
Look out for water stains on the side of or underneath the house, as well as cracking in the foundation walls. These are possible signs of poor drainage and movement.
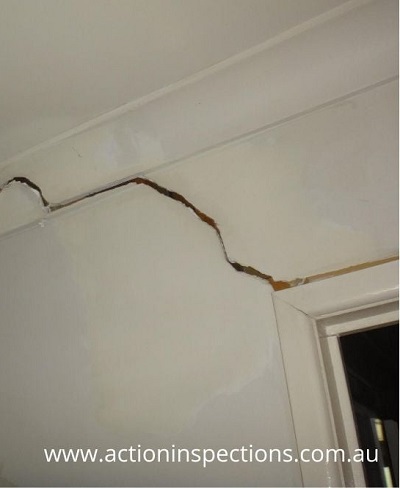
Uneven windows and doors
Don’t be afraid to go around opening and closing windows and doors during a house inspection, because if they don’t open or close properly, you’ve found yourself another red flag.
When windows and doors don’t close properly, and if there are obvious cracks in walls, there could be an underlying issue with the foundation. It could be a case of minor subsidence, or it could be a larger structural problem.
Strategically placed Furniture and rugs
It’s not unusual for a seller to stage their home to look its best, but be vigilant for signs that furniture items are being used to hide issues. From stains and warped floors lurking under decorative rugs, to wall cracks and water damage cleverly concealed behind bookshelves, don’t take any home at face value. Checking the hidden spots now could save you from running into costly and unpleasant surprises later!
Return to Top
Floor and Underfloor – what to look for
Starting from the ground up, the flooring in a house can tell you a lot about the history, maintenance, and structural integrity of a home. It might look amazing and freshly recarpeted, but what is hiding underneath?
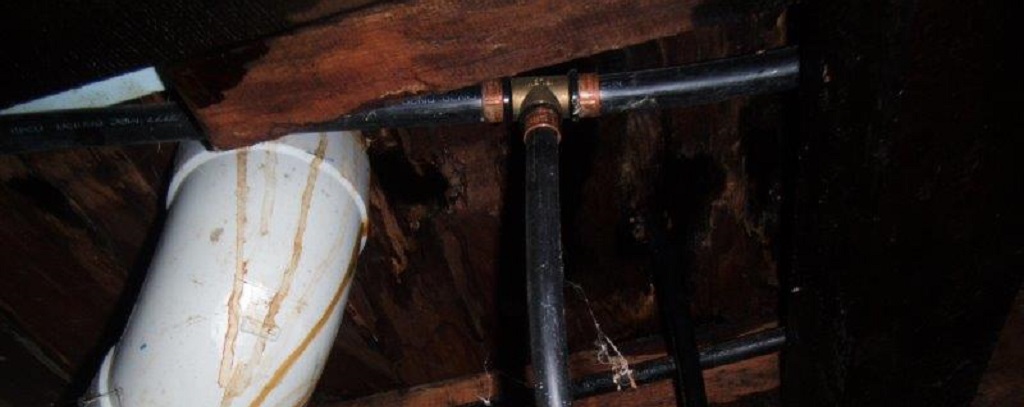
Common under house drainage issues building inspectors see
A pre-purchase inspection may uncover the following common issues:
- Unusual sewer or drain smell on the property
- Watermarks, stains, and decay under the flooring if visible or accessible underneath
- Wet patches or greener grass areas in the front and/or backyard – an indicator of stormwater drainage problems.
A building inspector is not licensed to diagnose the cause of the drainage issue. They will recommend a plumbing inspection to further investigate under-house drainage issues. While it may seem like an extra expense for a separate inspection by a plumber, it can give peace of mind to know what rectifications may be needed at the property if you become the new owner. A plumbing inspection may also find illegal plumbing connections.
The most common causes of drainage issues are:
- Blockages – whether from tree roots or foreign objects in the sewer or stormwater lines
- Broken pipes – this can allow tree roots and debris to enter the pipeline
- Bowed or misaligned pipes – if there is a dip in the pipework or it has misaligned due to subsidence or earth movement, a full excavation and new drainage installation may be required for the repair
What damage can drainage issues cause to concrete?
Concrete cancer is the layman’s term for the moisture-related deterioration of a concrete component. In building terminology, it is known as spalling damage. Spalling damage can be both unsightly and structurally devastating if not addressed.
Evidence of Concrete Cancer
Concrete cancer or spalling damage is actually very common in the homes we inspect throughout southeast Queensland every day. Below are just a few of the common areas where we regularly find evidence of spalling damage.

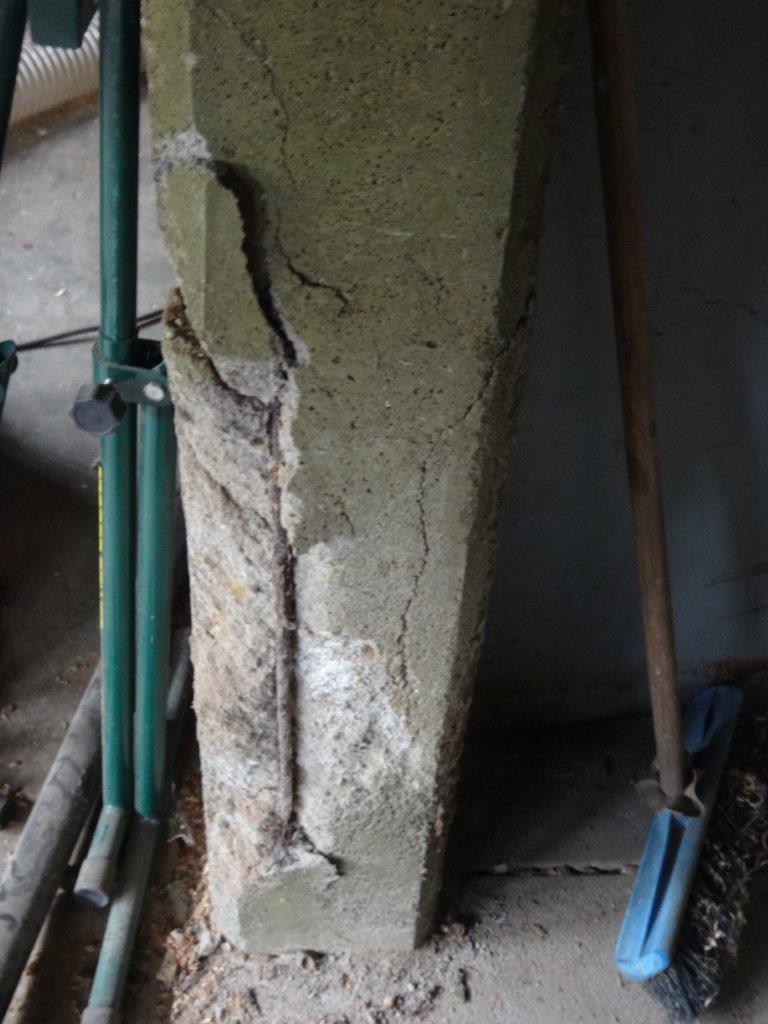
Stumps
One of the most common areas to see spalling damage is in the concrete stumps supporting your house. If adequate drainage is not maintained around a home, excessive moisture within the sub-floor area can be absorbed by the concrete stumps. This can lead to the premature corrosion of the steel within the concrete stumps, eventually rendering them incapable of supporting the load above. When inspecting your concrete stumps, you may initially notice some hairline cracking, particularly around the edges. This means that sooner or later, the stumps will require replacement.
Patio Slab
Inspection of the underside of your concrete patio slab is recommended where access is possible. Quite often, moisture passing through the concrete slab will contribute to spalling damage. If the damage has become excessive, it will be necessary for an engineer to evaluate the patio structure to determine whether it could be saved or if replacement is required.
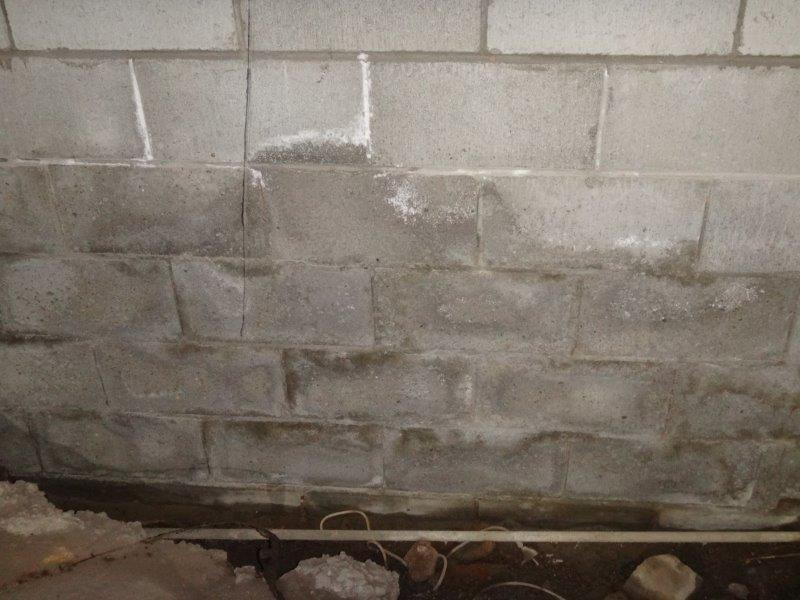
Slab Edge Moisture
Another common cause of concrete cancer (spalling damage) is slab edge moisture penetration. It’s most noticeable in a garage where the lack of floor coverings exposes a white powder known as efflorescence, and obvious slab moisture down the edge of the garage floor. Whilst damage to the concrete slab due to this type of moisture penetration is usually slow, it can eventually cause cracking and surface deterioration to the concrete slab.
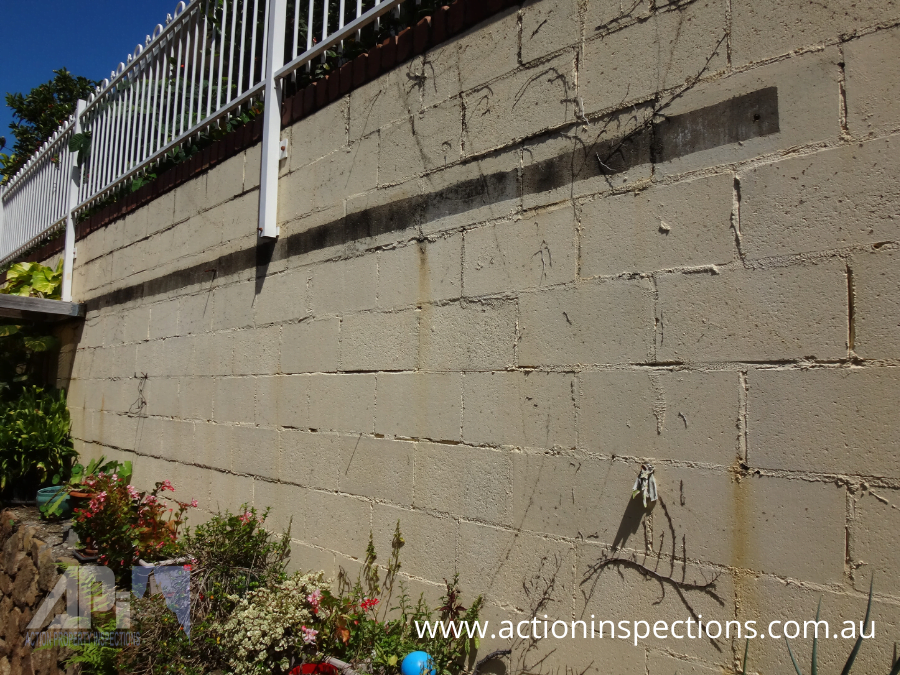
Retaining Walls
To avoid decay damage and termite attack, many people opt for concrete sleeper retaining walls. The downside is that they can succumb to concrete cancer. If the horizontal or vertical support sleepers are substantially compromised due to the level of spalling damage, then the wall will require replacement. Unfortunately, replacing a retaining wall can be a very costly process.
Wooden floorboards can give away hidden issues as well
Wooden floorboards are a popular choice of flooring in Brisbane due to many houses being placed on stumps or posts to avoid flooding.
The advantage of polished floorboards in these houses is that it’s quite easy to spot issues with the stumping and structural integrity of the home. Some signs to keep an eye out for with floorboards are:
- Loud creaking or movement in floorboards, even when carpet or laminate flooring is placed over them. Loud creaking and movement can be a sign of trouble in the undercarriage, from slight movement in the studs and support beams to structural wood rot and loss of support.
- Uneven or waved floorboards can also show that there is damage to the support beams or stilts that should be holding the house high and even.
- Spongy floorboards or gaps between the flooring and the skirting boards at the base of the wall is often a sign of sinking – a big and expensive problem. Causes include age, lack of maintenance, or even prior flood damage.

With any flooring issues, do not ignore the whispering of trouble. This is the foundation of the house, and any issue here can flow right through the property, causing you a very expensive list of repairs.
Return to Top
Walls – what to look for
Many property owners renovate, paint and decorate their property before it hits the market to attract the best price. However, sometimes fresh paintwork can hide expensive problems. Learn what to look for.
Keep these simple visual clues in mind when looking at the walls:
- A fresh paint job does not always mean a considerate vendor. Look for a single bedroom that has just been painted and is not the same colour as the rest of the house – it could be hiding damage that has occurred in that room and not the others.
- Consider that a freshly painted house may be to hide the defects and save the vendor money on repairs or loss of value.
- Mould or wet patches in the gyprock may be hiding a water leak or a recently badly repaired leak.
- Wavy gyprock or uneven walls can mean the ceiling or roof is leaking or that there is dampness somewhere in the house caused by plumbing or a recent water event.
Freshly renovated and load-bearing walls – Buyer Beware
When walls are removed to create open plan living, this renovation may not be all it’s cracked up to be. In fact, it may be a reason cracks start forming – especially when load-bearing walls are removed.
Load-bearing walls are vitally important to the structural integrity of your home. Simply put, load-bearing walls usually support second-story floor structures or roof areas while evenly distributing the load to a solid foundation base. Removal of a load-bearing wall can be disastrous if not professionally undertaken. The incorrect removal of a load-bearing wall could contribute to sagging and deflection of a roof structure or even possible structural collapse.
Subsidence and movement
Subsidence is the obvious movement and cracking of walls. Various factors contribute to the subsidence and movement of a house or unit complex. If you’re considering a house that shows signs of subsidence or movement, either run for the hills and don’t look back, or have the subsidence issues thoroughly investigated prior to purchasing. The cost of underpinning and various other rectification methods to prevent further subsidence is extremely costly.
What’s hiding behind the walls in the cavities?
Even a professional building inspection cannot meticulously detail what is going on behind walls in a property. However, there may be some hints that you can spot. Subtle hints in regard to problems with insulation can include:
- Air-conditioners on high during open inspections.
- Rooms that do not have individual air conditioners are hot compared to the other rooms, even if the doors are open.
- Open inspections held only in the early morning during cooler times or on cooler days.
- If the ceiling isn’t insulated, it may hint at the walls not being insulated.
Return to Top
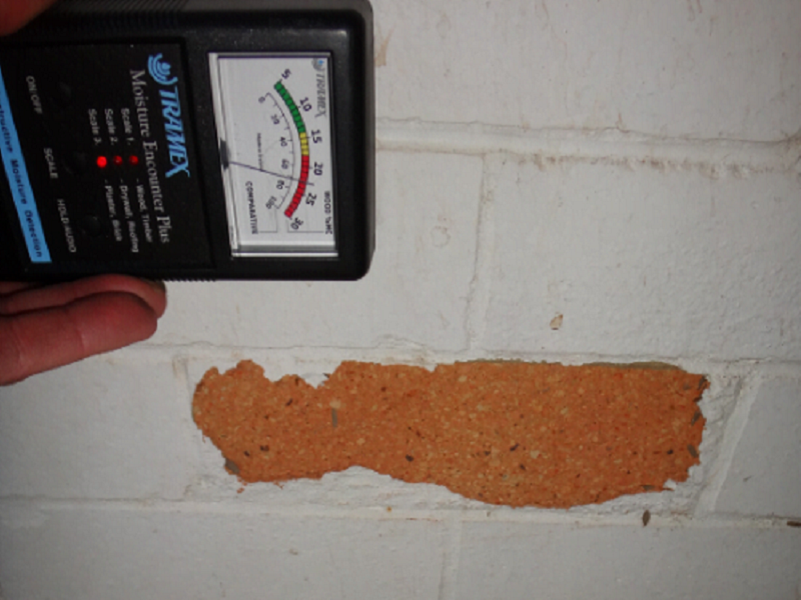
Water and Wet Areas – what to look for
Unprecedented Brisbane floods have made everyone nervous about water damage when inspecting new homes, but flood damage is just one of the ways a house can suffer moisture and damp issues. Wet areas can be just as much of a threat to your potential home as the river running three blocks away.
Keep an eye out for the following wet area red flags.
Waterproofing neglect
Waterproofing can be a major defect in houses when it hasn’t been done right or if it’s been skipped altogether. It’s a crucial installation for all wet areas of the home, including rooms that are exposed to rain and rising damp, to minimise the risk of water damage to the property.
An open home inspection is the perfect time to check the wet areas of the property to assess if they have been waterproofed sufficiently. This includes the bathrooms, kitchen, and laundry. Be sure to check the laundry, as new builds and renovators can skip this step to save money.
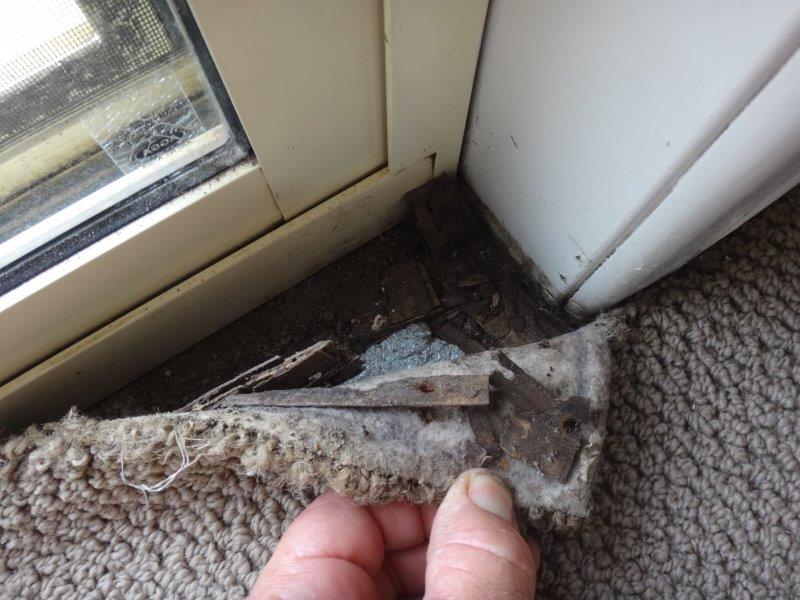
When water finds its way behind walls and under floors, it can:
- weaken timber studs and rot them away
- attract termites resulting in termite damage
- encourage mould and mildew growth which can be detrimental to health.
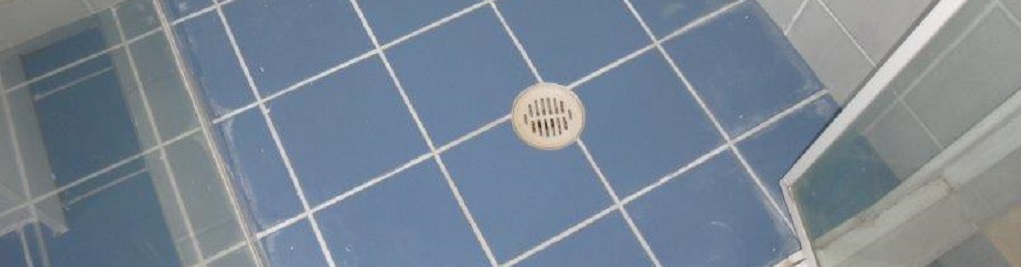
How can you tell if the laundry has a waterproof membrane?
There is no sure-fire way to tell if a laundry has a waterproof membrane unless a compliance certificate from the installer and homeowner can be supplied.
These checks are the ones to make when you’re not sure.
- Organise a pre-purchase building and pest inspection. A building inspector will be able to note water damage and structural integrity from their inspection.
- Look at walls and floor surfaces for mould and mildew.
- Make a note of how the tiled floor feels underfoot. If water squishes through the tiles or the tiles feel like they are floating on the floor, this is a sure sign no waterproofing has been installed in the laundry.
- Look for water damage underneath the floor if it’s a double storey property. Look at timber beams to check for rotting due to moisture.
Find out more about waterproofing your laundry here.
Types of Water Damage to look for
Rising damp
Rising damp occurs when water seeps into the walls of your home from the ground up.
Signs of rising damp:
- Tide marks (potentially up to 1m up the interior wall)
- Staining or blistered/peeling paintwork
- Musty smells
- Damaged skirting boards
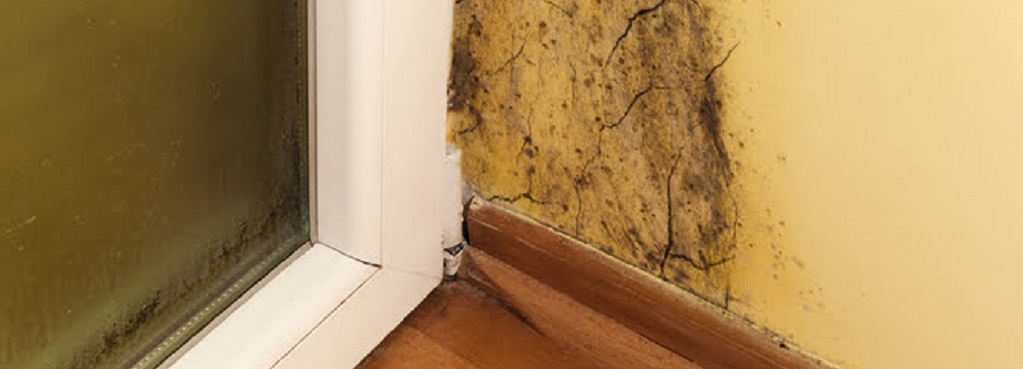
Condensation damp
The amount of moisture in a room can cause condensation damp, especially when the air outside is colder than inside. It’s most common in areas where there is a lot of moisture, like the kitchen, laundry, and bathroom.
Signs of condensation damp:
- Dark mould around windows
- Water droplets and dried water runs on windowpanes
- Streaking on walls


Penetrating damp
Water leaks in the wall or roof are referred to as penetrating damp. It can be caused by leaking roofs, damaged exterior walls, ill-fitted windows and doors, leaking downpipes or internal plumbing, overflowing gutters, etc.
Signs of penetrating damp:
- Sudden brown stains on interior walls/ceilings
- Wet, crumbly, or bubbly plaster
Lateral damp
Like rising damp, lateral damp occurs when water penetrates your wall. The causes of lateral damp are damaged wall tanking barriers, garden beds too close to the house, cracked walls, etc.
Signs of lateral damp:
- Damp patches at any height on walls
- Formation of salt crystals on walls
How to Detect Flood Damage
If your first and main concern is flood damage in your prospective new home, go straight to this article for a complete and comprehensive list of flood damage and water damage issues to look out for at an open inspection.
Return to Top
House Exterior – what to look for
Brick veneer homes
As is typical with any home over time, movement and settling of the building may cause some minor cracks to appear in the brick veneer. But sometimes cracks can have serious consequences.
A professional building inspector will look at:
- The state of the plasterboard opposite to the external cracks (do they mirror each other?)
- The alignment of the doors and windows
- Any separation between the ceiling, floors, and walls.
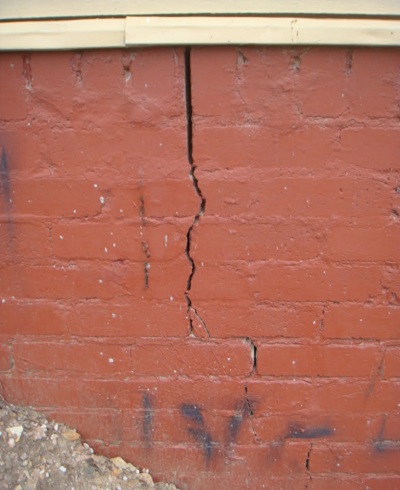
If any major flaws are identified, a structural engineer should be your next logical call. More significant cracking of a structural nature may require costly repairs such as underpinning.
Houses on stumps
So, you’ve seen that beautiful Queenslander house on stumps and are going to the open inspection. You love the thought of relaxing on the balcony, taking in the far-reaching views. There’s plenty to be excited about, but don’t forget the stumps under the house that hold you there. Without healthy stumps, that view can become a nightmare.
How to identify a stump house with stump problems
You can look for obvious signs in all stumped homes to identify if repairs or replacements are required. When at an open inspection, feel the floor as you walk. A dead giveaway of possible trouble is springy or uneven flooring. Less obvious signs are:
- Windows that don’t open or close easily because the frame is not square.
- Cracks in the interior walls.
- Gaps where the ceiling and the wall meet.

When looking at the home’s exterior, check for overgrown gardens near the stumps, gaps to infill cladding placed between the stumps, cracks in the external walls, and objects against the stumps that can act as superhighways to pests like termites. If you can see the stumps, visually inspect them for wood rot, rust, and concrete cancer where the internal steel reinforcing within the stumps is starting to rust and the concrete is cracking around it.
What building inspectors look for with a house on stumps
A professional should check for subtle signs by conducting a thorough underfloor inspection, even if there are no other red flags. Raise any issues you have spotted, and the inspector will also look for:
- Concrete spalling – where the concrete is cracking and blowing out, revealing that there is corrosion of the steel reinforcing within the stumps.
- Visible decay or damage – including wood rot and termite damage to timber stumps.
- Incorrect installation – such as lack of stump bracing and missing stump tie-down brackets.
- Ant caps – checking they are correctly placed, and all are accounted for.
Purchasing a home that requires restumping can be an expensive and heartbreaking repair if you are not expecting it. So be prepared and informed when considering a stumped house as your future home.
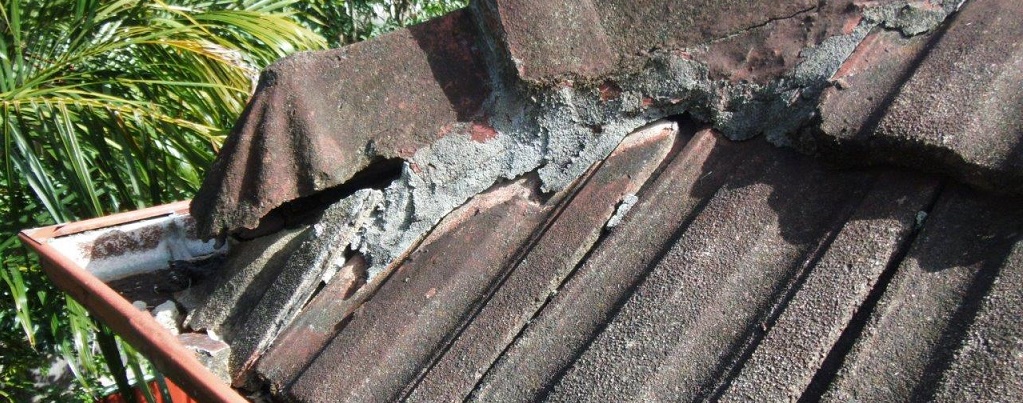
Roof integrity
Brisbane’s roofs have a lot to contend with, including high winds and storms, soaring temperatures, surrounding trees, and possums. It’s important to check the structure and roof space, looking for moisture, roof leaks and general damp issues. Also look for signs of structural failure, such as roof sagging and rust, and incorrect roof construction.

Water damage to the roof cavity
The common causes for water damage to the roof cavity include:
- Blocked gutters and downpipes
- Inadequate stormwater drainage
- Broken roof tiles
- Intense rain or hail storm
- Rusted roof sheets
- Rusted or deteriorated flashing around roof penetrations like vents and chimney
- Burst water pipe
- Poor weatherproofing
An inspection of the roof and gutters, including box and valley gutters, can determine the cause of the water leak.
Roof flashing and counter flashing
Roof flashing is an essential part of ensuring the roof doesn’t leak during a weather event. Typically made of a thin metal or rubber material, flashing is installed where two roof planes meet, where a roof plane meets a vertical wall, and around any penetrations on the roof. Penetration is tradie speak for any openings in the roof, e.g. for chimneys, skylights, and vents. Once installed, flashing directs water away from joints and penetrations, protecting the building from internal water damage.
Different parts of the roof require different types of flashing. The most common types of roof flashing are:
- Step flashing
- Apron/drip edge flashing
- Valley flashing
- Vent pipe flashing
- Counter flashing
Flashing can be damaged due to age, poor installation, or corrosion. In some cases, it may not need to be replaced and can be sealed with silicone for a temporary fix.
Damaged flashing will potentially allow water through the unprotected crevice, causing internal damage to the home. This could result in a wet patch on a ceiling, which will then need to be repaired or replaced. Water leaks in a roof can create problems within the property, the worst being a ceiling collapse or wet rot in the timber joists and framing, which can affect the structural integrity of the home.
Locating flashings during an open inspection is difficult – and climbing on the roof is not an option! However, if you walk around the perimeter of the building, you may see penetrations like a toilet vent or chimney. These should have flashings installed around them. From the ground, it’s usually not possible to gauge the condition of roof flashing.
Correctly installed flashing that’s in good working order is a property’s crucial first defence against water inundation, so it’s important to have it checked. Organise a pre-purchase building inspection and get the full picture.
Signs of water leaks in the roof
There are many reasons that a roof can leak, and some are technical. However, the general person can look for some simple but obvious signs like:
- The ceiling is sagging in the corners and shows slight discolouration.
- Obvious dark mould or discolouration on the ceiling.
- The ceiling is the only freshly painted surface in a room.
- Actual wetness or dampness seen on the ceiling or down the wall.
Gutters
You can have a fabulous new tin roof, but if the gutters are blocked or old and not compliant, then it’s a waste of time, and your home can still get damaged.
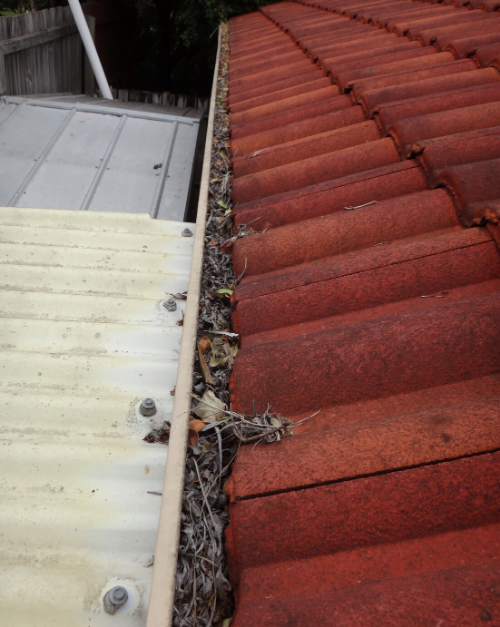
Regular cleaning of the gutters and downpipes should prevent water from flowing into the eaves and through the roof cavity. Water can travel fast, so it needs to be a major blockage to cause water to flow behind the brick veneer and into the internal structure of the home. This is not ideal and can attract termites (as they love moisture) or cause mould and mildew. If left too long, it can cause structural damage.
Exterior Extras, Pergolas and Entertaining Areas – what to look for
Visual inspection of pergola and deck
There are some red flags to keep an eye out for with pergolas and decks. These are the obvious signs that the pergola or decking may be in dire need of repair or are a potential safety risk.
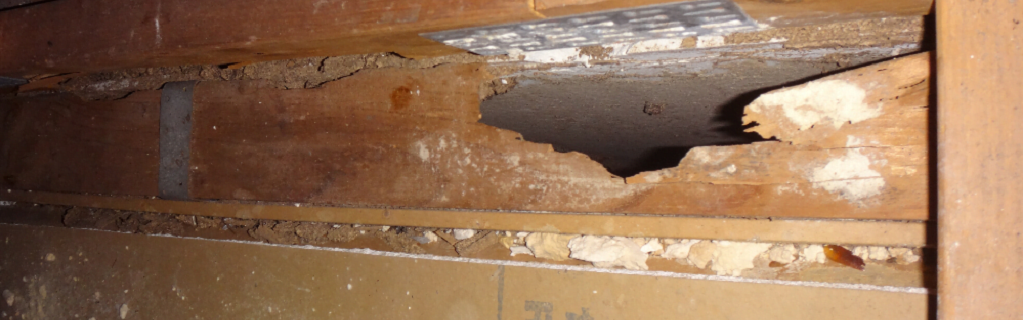
- Decay damage: Moisture causes wood rot that can jeopardise the structural integrity of a deck or pergola structure. Decay is common to the bottom of supporting timber posts, along the top edge of rafters and floor joists.
- Termite damage: These pests can cause considerable damage by devouring timber components until they are no longer sound. Look out for signs of hard mud tracking up support posts, and where possible, give timber components a tap to listen for a hollow sound.
Structure stability
In some cases, you may not be able to visually inspect under the deck structure or around the base of the pergola supports. Trust your gut. If it moves in the wind or is wobbly when you push firmly or shake a structure, this is a sign of instability. The instability could be due to incorrect construction or deterioration – both require urgent attention. Excessive movement could lead to structural failure. This poses a serious safety issue and could have substantial consequences for liability or insurance.
Check the fixings and roof sheeting
Queensland can have some wild weather, so ensure pergola and/or deck fixings and roof sheeting are adequate and well secured. Look for signs of rusting brackets, rafters coming loose, or unusual gaps between timber components. Pushing up on roof sheeting where possible can also highlight if it’s coming loose. You do not want to be rescuing your roofing from the neighbour’s yard after a big storm!
Return to Top
Pest and Insect Red Flags
Termites, possums, rats, and mice – they’re hard to detect, but you can keep a look out for tell-tale signs.
- Termites: look for these 10 signs a house has termite damage.
- Possums: listen for noise in the roof, particularly at night. Checking the attic or roof space is also another way to detect if there are possums present.
- Rats and Mice: a clean seller has likely vacuumed up any evidence of rat or mouse poo but keep a look out for droppings in nooks and crannies that may have been missed.
Our inspector can identify certain pest-related issues, including:
- bees nests in brick walls
- obvious termite damage
- termite mounds or nests
However, we do not specialise in pest inspections and control. It is highly recommended that you engage a pest inspection professional to inspect any prospective property you might be considering purchasing.
Return to Top
How to evaluate and act on red flags
If you’ve identified red flags during an open inspection, here are the steps you need to take.
1. Engage a professional building inspector
They’ll conduct a thorough inspection on the property, checking for the red flags you’ve noted and identifying any defects you missed. Once completed, you’ll receive a comprehensive inspection report outlining the severity of each defect, repair recommendations, and an estimated timeframe for how soon they’ll need to be carried out.
2. Carefully consider your property inspection report
Take your time to read through the inspection findings. You may need to book additional specialist inspections (pests, electrical, plumbing, etc) to ensure you have a complete picture of the property you intend to buy. From here, you can decide whether your budget can cover red flag repairs or if they’re a dealbreaker.
3. Make your decision – with confidence!
Armed with a comprehensive inspection report, you’re now in a position to negotiate. You may choose to;
- negotiate a lower purchase price
- request that the seller fix the problems before purchase
- walk away if the issues are too severe.
What to ask the seller’s real estate agent
The seller’s real estate agent will likely be on hand to answer questions from buyers. Here’s what to ask.
- How long has the property been on the market? You will know the answer already from your investigations, but the longer a property is on the market, generally the more wiggle room on price.
- What is the current land valuation and rates bill?
- What are the known issues with the property (they’re legally obliged to tell you)?
- Is the property subject to any strata/body corporate/other fees?
What happens after the open house inspection?
If you’ve made an offer and you’re the only one, you’ll sign off on the paperwork and the whole process will accelerate very quickly. You’ll only have two weeks to get your legal and financial ducks in a row – and don’t skip the building and pest inspections. Notify your team immediately so they have plenty of time to carry out all the necessary due diligence. If any of them hit a problem, you’re at risk of losing the property if you don’t have enough time to sort it out. Don’t muck around – be ready.
If multiple offers come in, you will need to decide if you want to enter a bidding war. That’s a whole other blog post!
Protect yourself with a Pre-purchase Building Inspection
Our ultimate guide to open house inspections is a great starting point on your property buying journey. However, there is much that can be missed – even by the most conscientious of house hunters. To protect yourself and your investment, book a thorough pre-purchase building inspection with Action Property Inspections today.